A few months ago, I blogged about how to create *sticky posts* on your blogger blog!
Let's take it to another level!
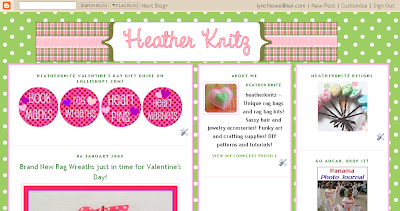
Over the holidays, I first used this idea and created a "holiday gift guide"...I created simple, attractive buttons that targeted specific areas of my online shops and turned it into a sticky post so that it is the FIRST thing that readers see!
You could create sticky posts for new products, specials or anything else you want your readers to see FIRST!
You can see my sticky buttons above...I am using them to highlight my newly created Valentine's Day items!
-----------------------------------------------
- Using picnik, I created simple little buttons to use as the graphics for my sticky post! I used the editing features under *create* to add the hearts and to make the round shapes and to add the text.
- I then uploaded the images to my free photobucket account. Once you upload your graphics to your photobucket account, you can copy/paste the html code it gives you for each individual graphic.
- Then, open your blogger blog up. Go to customize. Click on add page element, click on add html code. Copy the graphic html code into that box that opens.Click on save.

 Step1: Connect to your Blogger account and click "Layout" in the "Dashboard."
Step2: Select "Add a Page Element" and choose the function you want to use as your "sticky post." For example, if you would like to announce an ongoing contest, you can choose "Text" and enter the details. "Text" allows you to add and edit HTML. By selecting "HTML/JavaScript," you also can choose to link to a previously written, archived post that gives the written details of the contest.
Step3: Complete the "Add a Page Element" template, click and drag the item to the "Blog Posts" section.
Step4: Click "Preview" to make sure the sticky post appears at the top of the page. Then click "Save."
- You can create more than one "sticky post."
- Using a "sticky post" is an effective way to drive traffic to additional sites you may have, such as another blog or online retail shop.
- “Sticky posts" have no expiration date. To remove a "sticky post," simply click "Remove Page Element."


5 comments:
That is so cool. Very helpful, I'm going to try these sticky posts.
Jen
This is so exciting, thanks for taking the time to write up this tutorial! I am going to try this in a few days when I get a chance.
I will have to try this. Thanks for finding and posting this tip!
Fantastic post! As a side note, you can do the same thing on a Wordpress blog by using a plug-in called WP-Sticky. But I still love the tutorial on how to do it on a Blogger blog.
Thanks so much, everyone! I'm glad you find it to be helpful!
Thanks so much for sharing about wordpress blogs, Nicolette!
Happy creating stickies:)
Post a Comment